The Future of Web Dev
The Future of Web Dev
Turn SVG Files Into Interactive 3D WebGL Objects – 3dsvg
A React component with a web editor that turns SVG files and text into interactive 3D WebGL objects. Supports 10 material presets and 7 animations.
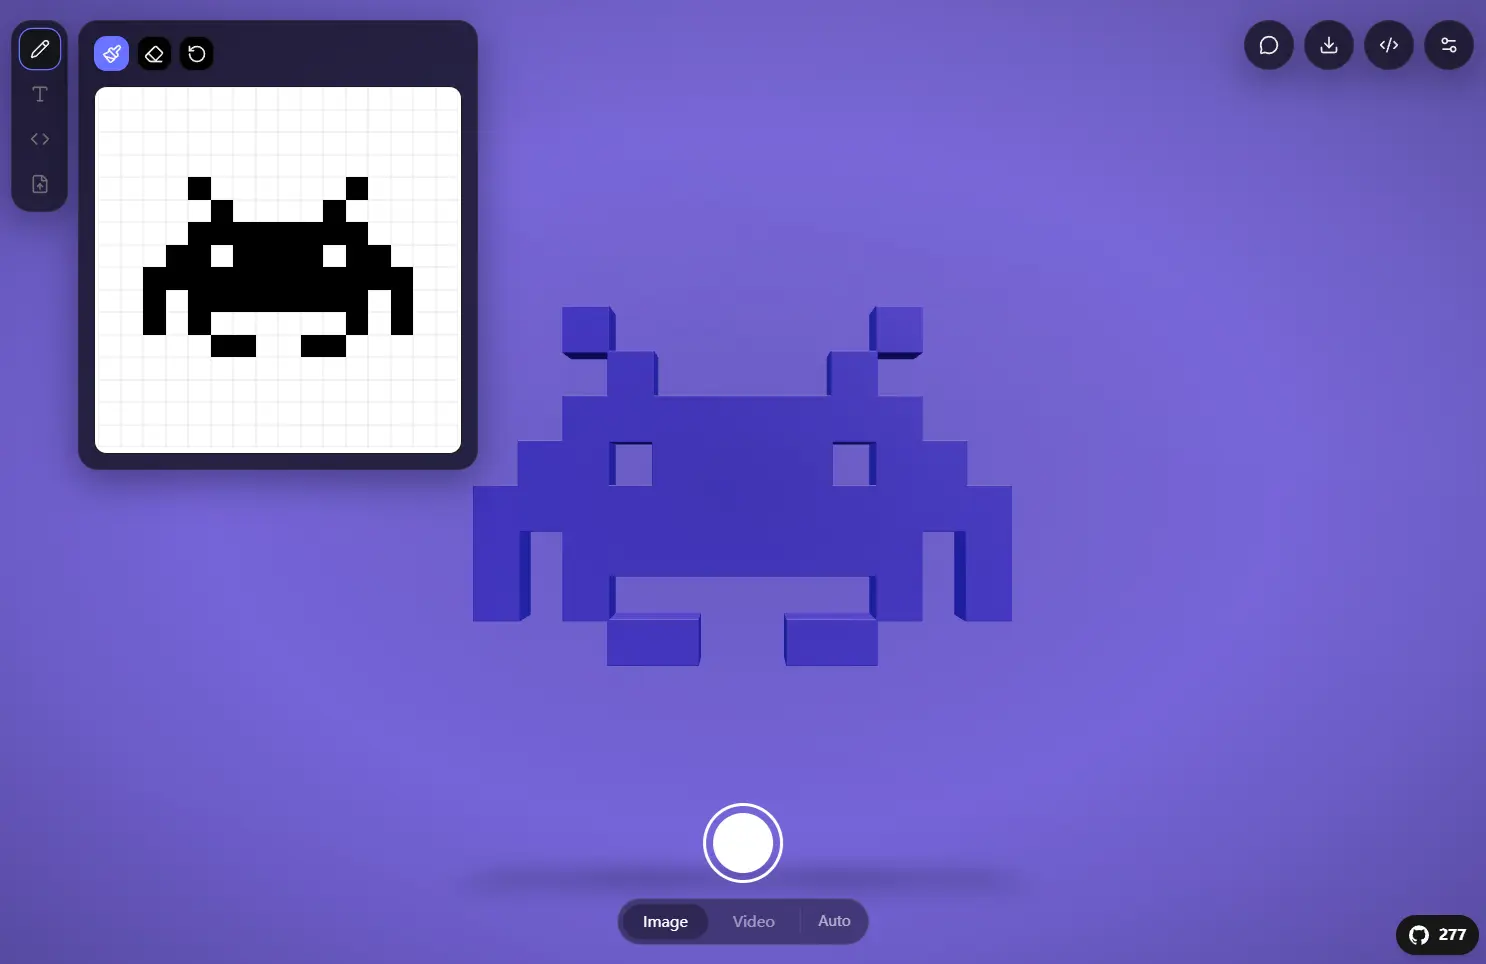
3dsvg is a React component library and browser editor that turns SVGs, text, and pixel art into interactive 3D assets.
The project ships as a monorepo with an embeddable SVG3D component for React apps and a separate web editor that uses the same rendering engine.
The engine runs on Three.js via React Three Fiber. It accepts SVG markup, public folder paths, remote URLs, and plain text rendered through Google Fonts. Each input extrudes into a 3D mesh with configurable material presets, lighting rigs, camera angles, and loop animations.
The web editor runs on Next.js and adds PNG export, video export through FFmpeg WASM, 3D model export, drag and drop input, and copy-ready JSX embed output.
Features
🧱 SVG to 3D Extrusion: Converts SVG paths into extruded 3D meshes with adjustable depth and bevel quality.
✍️ 3D Text Rendering: Renders text as 3D geometry with 10 available Google Fonts.
🎨 10 Material Presets: Covers plastic, metal, glass, rubber, chrome, gold, clay, emissive, holographic, and a balanced default.
💡 Configurable Lighting: Controls key light position and intensity, ambient fill, and contact shadows independently.
📷 Camera Controls: Sets initial rotation angles, zoom distance, and field of view, with automatic narrow-viewport scaling.
🖱️ Interaction Modes: Supports drag-to-rotate, cursor-follow orbit, scroll zoom, and idle reset behavior.
🎬 7 Animation Types: Loops through spin, float, pulse, wobble, swing, spinFloat, or stays static.
🎞️ Intro Sequences: Plays a zoom, fade, or skipped intro with configurable duration and start/end states.
🖼️ Texture Mapping: Maps image URLs onto the 3D surface with tiling count, rotation, and UV offset controls.
📡 Async Loading Progress: Tracks geometry processing progress for complex SVGs through a callback with loading state and percentage.
🖥️ Visual Web Editor: Designs objects at 3dsvg.design and exports PNG (up to 4K), 60fps video (MP4/WebM), 3D models (GLB/STL/OBJ/PLY), or a ready-to-paste JSX snippet.
Use Cases
- Build an animated 3D logo block for a React landing page.
- Turn brand SVG files into draggable hero graphics for marketing sites.
- Create 3D text badges for portfolio pages and product launches.
- Export GLB or STL files from flat artwork for 3D mockups and print workflows.
How to Use It
Table Of Contents
- Installation
- Basic Usage in React
- Usage in Next.js
- Tracking Load Progress
- Configuring Material, Lighting, and Camera
- Controlling Interaction
- Configuring Intro Animation
- Using the Web Editor
- Running the Web Editor Locally
- Content Props
- Shape Props
- Material Props
- Texture Props
- Lighting Props
- Camera Props
- Interaction Props
- Animation Props
- Intro Props
- Layout Props
- Event Props
Installation
npm install 3dsvgInstall peer dependencies if they are not already present in the project:
npm install react react-dom three @react-three/fiber @react-three/dreiBasic Usage in React
import { SVG3D } from "3dsvg";
// Render 3D text
<SVG3D text="Hello" animate="spin" />
// Load from the public folder
<SVG3D svg="/logo.svg" material="gold" animate="float" />
// Pass inline SVG markup
<SVG3D svg='<svg viewBox="0 0 24 24"><path d="M12 2L2 7l10 5 10-5z"/></svg>' />
// Load from a remote URL
<SVG3D svg="https://cdn.example.com/icon.svg" material="metal" />
Usage in Next.js
<SVG3D> depends on browser WebGL APIs that are unavailable at render time on the server. Wrap it with next/dynamic and disable SSR:
import dynamic from "next/dynamic";
const SVG3D = dynamic(
  () => import("3dsvg").then((m) => ({ default: m.SVG3D })),
  { ssr: false }
);
export default function Page() {
  return <SVG3D text="Next.js" material="chrome" animate="spin" />;
}
Tracking Load Progress
Complex SVGs process asynchronously in batches. Use the loading callback to show a progress indicator:
import { SVG3D } from "3dsvg";
function HeavySVG() {
  return (
    <SVG3D
      svg="/complex-illustration.svg"
      onLoadingChange={(loading, progress) => {
        if (loading) {
          console.log(`Processing: ${progress}%`);
        } else {
          console.log("Geometry ready");
        }
      }}
    />
  );
}
Configuring Material, Lighting, and Camera
<SVG3D
  svg="/logo.svg"
  material="glass"
  color="#00aaff"
  depth={2}
  smoothness={0.8}
  lightPosition={[3, 10, 3]}
  lightIntensity={1.5}
  ambientIntensity={0.4}
  shadow={true}
  rotationY={0.3}
  zoom={10}
  fov={45}
/>
Controlling Interaction
<SVG3D
  svg="/icon.svg"
  interactive={true}
  cursorOrbit={true}
  orbitStrength={0.2}
  draggable={true}
  scrollZoom={false}
  resetOnIdle={true}
  resetDelay={3}
/>
Set interactive={false} to disable all drag, zoom, and orbit behavior at once, for example on a static embed where page scroll should not conflict with the canvas.
Configuring Intro Animation
<SVG3D
  svg="/logo.svg"
  intro="zoom"
  introDuration={3}
  introFrom={{ zoom: 20, opacity: 0 }}
  introTo={{ zoom: 8, opacity: 1 }}
  onAnimationComplete={() => console.log("Intro finished")}
/>
Using the Web Editor
Visit 3dsvg.design to design 3D objects visually. The editor accepts four input types: text (10 Google Fonts), SVG code, file upload, and pixel art. After configuring material, lighting, animation, and camera settings, export the result as a PNG (up to 4K), a 60fps video (MP4 via FFmpeg WASM or WebM), a 3D model (GLB preserves color and materials; STL works for 3D printing; OBJ and PLY also available), or a <SVG3D> JSX snippet that reproduces the exact editor state.
Running the Web Editor Locally
From the monorepo root:
npm install
npm run build:engine
npm run dev:web
The editor starts at http://localhost:3000. It imports the engine as a workspace dependency ("3dsvg": "file:../engine"), so rebuild the engine after any source changes to packages/engine.
API Reference
Content Props
| Prop | Type | Default | Description |
|---|---|---|---|
text | string | — | Text to render as 3D geometry |
font | string | "DM Sans" | Google Font name for text rendering |
svg | string | — | SVG markup string, public path, or remote URL. Takes priority over text when both are set |
Shape Props
| Prop | Type | Default | Description |
|---|---|---|---|
depth | number | 1 | Extrusion depth (0.5 = flat, 10 = very deep) |
smoothness | number | 0.2 | Curve and bevel quality (0–1) |
color | string | "#ffffff" | Base color in hex. Resets to white when a texture is active |
Material Props
| Prop | Type | Default | Description |
|---|---|---|---|
material | MaterialPreset | "default" | Material preset name |
metalness | number | — | Overrides preset metalness (0–1) |
roughness | number | — | Overrides preset roughness (0–1) |
opacity | number | — | Overrides preset opacity (0–1) |
wireframe | boolean | false | Renders the mesh in wireframe mode |
Material Presets:
| Preset | Metalness | Roughness | Notes |
|---|---|---|---|
default | 0.15 | 0.35 | Balanced starting point |
plastic | 0.0 | 0.3 | Smooth, non-reflective |
metal | 0.9 | 0.2 | Brushed metal |
glass | 0.1 | 0.05 | Transparent with refraction |
rubber | 0.0 | 0.9 | Matte, soft |
chrome | 1.0 | 0.05 | Mirror-like reflections |
gold | 1.0 | 0.25 | Gold tint applied automatically |
clay | 0.0 | 1.0 | Fully matte |
emissive | 0.0 | 0.5 | Self-illuminated glow |
holographic | 0.8 | 0.1 | Transparent with clearcoat |
Texture Props
| Prop | Type | Default | Description |
|---|---|---|---|
texture | string | — | Image URL to map onto the 3D surface |
textureRepeat | number | 1 | Number of times the texture tiles across the surface |
textureRotation | number | 0 | Texture rotation in radians |
textureOffset | [number, number] | [0, 0] | UV offset as [x, y] |
Lighting Props
| Prop | Type | Default | Description |
|---|---|---|---|
lightPosition | [number, number, number] | [5, 8, 5] | Key light position as [x, y, z] |
lightIntensity | number | 1.2 | Key light brightness |
ambientIntensity | number | 0.3 | Ambient fill light level |
shadow | boolean | true | Toggles contact shadows |
Camera Props
| Prop | Type | Default | Description |
|---|---|---|---|
rotationX | number | 0 | Initial X rotation in radians |
rotationY | number | 0 | Initial Y rotation in radians |
zoom | number | 8 | Camera distance from the object |
fov | number | 50 | Field of view in degrees |
The camera scales out automatically on narrow or portrait viewports, keeping the object fully visible without any manual adjustment.
Interaction Props
| Prop | Type | Default | Description |
|---|---|---|---|
interactive | boolean | true | Master toggle for all interactions. false disables drag, zoom, and orbit simultaneously |
cursorOrbit | boolean | true | Object tracks cursor position subtly |
orbitStrength | number | 0.15 | Cursor-follow intensity in radians |
draggable | boolean | true | Drag-to-rotate |
scrollZoom | boolean | false | Scroll-to-zoom. Off by default to avoid conflict with page scroll on embeds |
resetOnIdle | boolean | false | Returns to default position after a period of inactivity |
resetDelay | number | 2 | Seconds of inactivity before reset triggers |
Animation Props
| Prop | Type | Default | Description |
|---|---|---|---|
animate | AnimationType | "none" | Loop animation type |
animateSpeed | number | 1 | Speed multiplier |
animateReverse | boolean | false | Reverses animation direction |
Animation types: none · spin · float · pulse · wobble · spinFloat · swing
Intro Props
| Prop | Type | Default | Description |
|---|---|---|---|
intro | string | "zoom" | Intro animation style. Options: zoom, fade, none |
introDuration | number | 2.5 | Intro duration in seconds |
introFrom | object | { zoom: 18, opacity: 0 } | Starting state for the intro |
introTo | object | { zoom: 8, opacity: 1 } | Ending state for the intro |
Layout Props
| Prop | Type | Default | Description |
|---|---|---|---|
width | string | number | "100%" | Container width |
height | string | number | "100%" | Container height |
background | string | "transparent" | Canvas background color |
className | string | — | CSS class applied to the wrapper element |
Event Props
| Prop | Type | Description |
|---|---|---|
onReady | () => void | Fires when the WebGL context is ready and the first frame renders |
onAnimationComplete | () => void | Fires when the intro animation finishes |
onLoadingChange | (loading: boolean, progress: number) => void | Fires during geometry processing with a loading flag and progress value (0–100) |
Related Resources
- React Three Fiber: Declarative React renderer for Three.js scenes.
- Three.js: The underlying WebGL engine that handles 3D geometry and rendering.
- Drei: Helper library for React Three Fiber with ready-made cameras, controls, and loaders.
FAQs
Q: Does 3dsvg work in Next.js App Router?
A: Yes. Import <SVG3D> with next/dynamic and set ssr: false.
Q: Can I use any SVG file, or does it need a specific format?
A: The component accepts an SVG markup string, a public folder path, or a remote URL. Files with complex paths process in async batches to keep the browser responsive. Use the loading progress callback to track completion and display a loading indicator during that time.
Q: How do I prevent the component from intercepting page scroll?
A: Set scrollZoom={false}. This is the default. The prop is off by default specifically to prevent the canvas from capturing scroll events on pages where the component sits inline with other content.
Q: What happens to the base color when I apply a texture?
A: The base color resets to white automatically. This prevents the color prop from tinting the texture so the image maps onto the surface at full fidelity.
