The Future of Web Dev
The Future of Web Dev
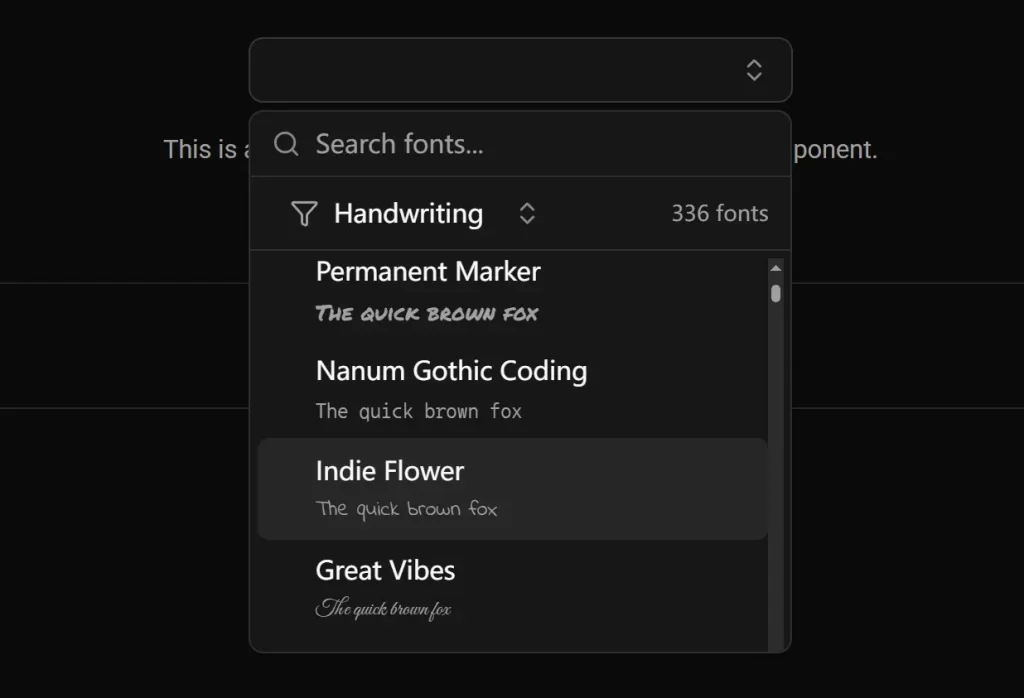
Performant Google Font Picker Component with shadcn/ui
Add font selection to your Next.js project with this shadcn/ui Google Font Picker component. Simple API, virtualized rendering, and accessibility included.

If you’ve ever tried to roll your own Google Font picker, you know it can get surprisingly fiddly – fetching the massive list, handling previews, making it searchable, maybe filtering… it’s a chunk of work.
I recently came across a specific component for this: the Google Font Picker Component for shadcn/ui. It’s a pre-built component that lets your users browse, search, and pick Google Fonts right within your application.
This component is can be useful for projects where users need some control over typography – think theme builders, profile customization sections, or basic content editing tools.
Features
Font Search: Users can type font names to quickly find what they’re looking for. Standard stuff, but essential.
Live Preview: As users hover or select fonts, they see the text update. It loads the actual font file smoothly for an accurate preview.
Accessible: Built on top of shadcn/ui‘s components (Command, Popover, etc.), so it inherits their accessibility considerations.
Configurable: Props allow setting dimensions and toggling features like the filters.
Category Filtering: Filters for serif, sans-serif, display, handwriting, and monospace are built-in. Helps narrow down that huge list.
Responsive: Works reasonably well on different screen sizes out of the box.
Customizable: You can tweak styling with className and adjust dimensions.
Virtualized List: It uses react-window, meaning it only renders the fonts currently visible in the list plus a small buffer. Browsing hundreds (or thousands) of fonts stays snappy without bogging down the DOM.
Installation:
1. Add the peer dependencies. react-window is for the virtualization, and lucide-react is likely used for icons within the shadcn/ui components.
npm install lucide-react react-window2. Make sure you have the necessary shadcn/ui components installed.
npx shadcn-ui@latest add button command dropdown-menu popover3. Set up your Google Fonts API key as an environment variable. Create a .env.local file in your project root (if you don’t have one) and add your key:
NEXT_PUBLIC_GOOGLE_FONTS_API_KEY=your_google_fonts_api_key_hereHow to use it
1. Import it into your React component:
import { useState } from "react"; // Make sure useState is imported
import { FontPicker } from "@/components/ui/font-picker"; // Adjust path if needed
2. Render the component and manage its state:
export default function MyFontSelectionComponent() {
  // State to hold the selected font family name
  const [selectedFont, setSelectedFont] = useState<string | undefined>("Inter"); // Default to 'Inter' or undefined
  return (
    <div>
      <label>Select Font:</label>
      <FontPicker
        value={selectedFont}
        onChange={setSelectedFont} // Update state when a font is picked
        width={300} // Adjust width as needed
        height={400} // Adjust height as needed
        showFilters={true} // Show category filters
        className="mt-2" // Add custom styling
      />
      {selectedFont && (
        <p className="mt-4" style={{ fontFamily: selectedFont }}>
          Preview Text: The quick brown fox jumps over the lazy dog.
        </p>
      )}
    </div>
  );
}
The value prop controls the currently selected font (useful for setting defaults or reflecting saved preferences), and onChange is the callback that gives you the newly selected font family name (a simple string like "Roboto" or "Open Sans"). You then typically store this string in your component’s state.
You can tweak the width, height, and whether showFilters is displayed. The className prop works as expected for adding Tailwind utility classes or your own custom CSS classes.
Related Resources
- Google Cloud Console: https://console.cloud.google.com/ – Where you get the Google Fonts API key.
- shadcn/ui Documentation: https://ui.shadcn.com/docs – For info on the underlying components used (Popover, Command, etc.).
- react-window: https://github.com/bvaughn/react-window – If you’re curious about how the virtualization works under the hood.
- Google Fonts: https://fonts.google.com/ – To browse fonts directly.
FAQs
Q: Do I absolutely need a Google Fonts API key?
A: Yes. The component uses the API to fetch the list of available fonts dynamically, including their categories, variants, etc. Without the key, it can’t populate the font list.
Q: How exactly does the virtualization help performance?
A: Instead of rendering potentially thousands of font preview elements into the DOM at once (which is very slow), react-window calculates which list items should be visible based on the scroll position and container size. It only renders those few items, plus a small buffer above and below. As you scroll, it efficiently removes items going out of view and adds items coming into view. This keeps the DOM small and the UI responsive.
Q: How can I add selected fonts to my global styles?
A: After selection, you’ll want to dynamically import the font and add it to your CSS variables or Tailwind config. For Tailwind, you might update your config programmatically or store font choices in a database.
Preview