The Future of Web Dev
The Future of Web Dev
Glassmorphism-style Next.js Portfolio Template – Link in Bio
Build a modern link-in-bio portfolio with Next.js, Tailwind CSS, and Framer Motion. Features a glassmorphism design and blog carousel.

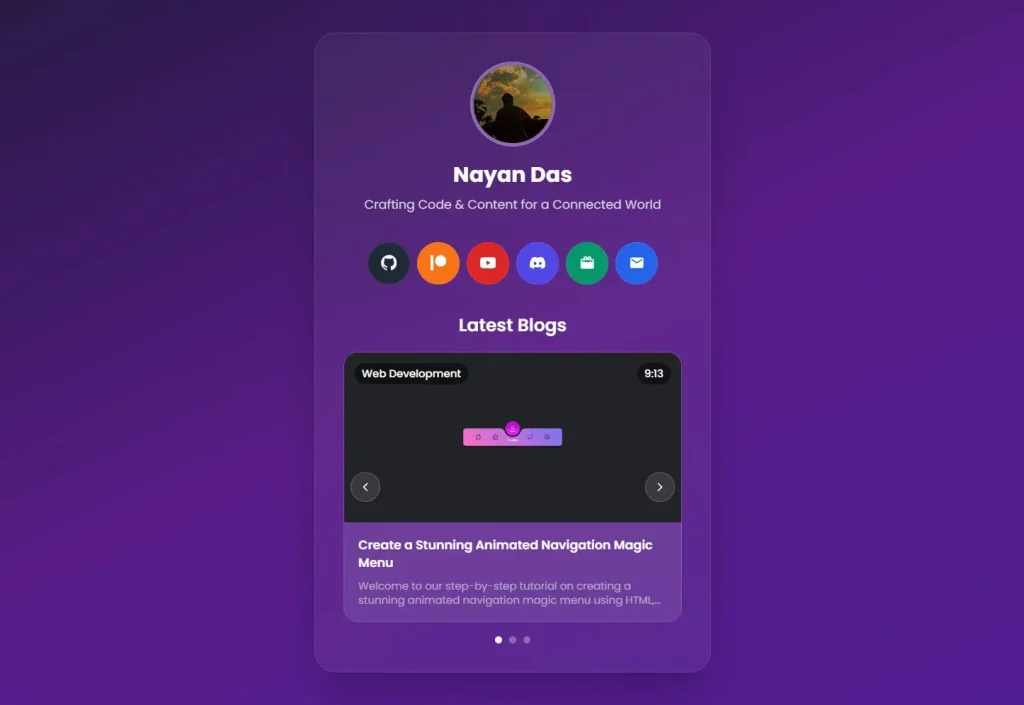
Link in Bio is a modern, Glassmorphism-style, Next.js portfolio template for content creators, developers, and professionals who need an elegant web presence for their social media links and portfolio content.
The template currently comes with 3 components: a social media system that supports six major platforms with custom styling, an auto-playing blog carousel that displays YouTube videos in modal popups, and a responsive design system that works across all device types.
Features
🎨 Glassmorphism UI design with backdrop blur effects and translucent elements.
🌓 Automatic dark and light mode switching with system preference detection.
📱 Fully responsive layout optimized for desktop, tablet, and mobile devices.
🎯 Six social platform integration with custom SVG icons and hover tooltips.
🎪 Auto-playing blog carousel with manual navigation and touch gesture support.
🎬 YouTube video integration with modal popup functionality.
⚡ Next.js App Router architecture for optimal performance.
🎭 Smooth animations powered by Framer Motion library.
🔍 SEO optimization with proper metadata and structured content.
📝 TypeScript integration for enhanced code reliability and maintainability.
Preview
Use Cases
- Personal branding websites for content creators who need to direct followers from multiple social platforms to their various online presences.
- Developer portfolios that showcase both technical projects and social media content in a unified interface.
- Professional service providers who want to consolidate their contact information, social proof, and latest content updates.
- YouTube creators and bloggers who need a central hub to display their latest videos and blog posts with proper categorization.
- Freelancers and consultants who require a professional landing page that converts social media traffic into business inquiries.
How to Use It
1. Clone the repository from GitHub:
git clone https://github.com/nayandas69/linkinbio-nextjs.git
cd linkinbio-nextjs
2. Install the necessary packages using npm:
npm install3. All personal data is located in the app/page.tsx file. Open this file to modify your name, bio, social media links, and blog posts.
To change your social links, find the socialLinks array and edit the objects within it. You can change the URL, icon, and background color for each platform.
const socialLinks = [
  {
    name: "GitHub",
    url: "https://github.com/nayandas69",
    icon: GitHubIcon,
    color: "from-gray-700 to-gray-900",
    hoverColor: "hover:from-gray-600 hover:to-gray-800",
    bgColor: "bg-gray-800",
  },
  {
    name: "Patreon",
    url: "https://patreon.com/NayanDas69",
    icon: PatreonIcon,
    color: "from-orange-500 to-red-600",
    hoverColor: "hover:from-orange-400 hover:to-red-500",
    bgColor: "bg-orange-500",
  },
  {
    name: "YouTube",
    url: "https://youtube.com/@dasnayan69",
    icon: YouTubeIcon,
    color: "from-red-500 to-red-700",
    hoverColor: "hover:from-red-400 hover:to-red-600",
    bgColor: "bg-red-600",
  },
  {
    name: "Discord",
    url: "https://discord.gg/skHyssu",
    icon: DiscordIcon,
    color: "from-indigo-500 to-purple-600",
    hoverColor: "hover:from-indigo-400 hover:to-purple-500",
    bgColor: "bg-indigo-600",
  },
  {
    name: "Website",
    url: "https://nayandas69.github.io/link-in-bio",
    icon: BriefcaseIcon,
    color: "from-emerald-500 to-teal-600",
    hoverColor: "hover:from-emerald-400 hover:to-teal-500",
    bgColor: "bg-emerald-600",
  },
  {
    name: "Email",
    url: "mailto:[email protected]",
    icon: EmailIcon,
    color: "from-blue-500 to-cyan-600",
    hoverColor: "hover:from-blue-400 hover:to-cyan-500",
    bgColor: "bg-blue-600",
  },
]
To update the blog section, edit the blogData array. Replace the sample data with your own titles, descriptions, YouTube video IDs, and thumbnails.
const blogData = [
  {
    id: 1,
    title: "Create a Stunning Animated Navigation Magic Menu",
    description:
      "Welcome to our step-by-step tutorial on creating a stunning animated navigation magic menu using HTML, CSS, and JavaScript! Learn modern web development techniques.",
    videoId: "SRShOP9iKRc",
    thumbnail: "/images/blog1.png",
    category: "Web Development",
    duration: "9:13",
  },
  {
    id: 2,
    title: "Build a Stylish Password Strength Checker",
    description:
      "Welcome to our step-by-step tutorial on building a sleek and functional Password Strength Checker using HTML, CSS, and JavaScript. Perfect for beginners!",
    videoId: "gbfoGJLlXgI",
    thumbnail: "/images/blog2.png",
    category: "JavaScript",
    duration: "5:45",
  },
  {
    id: 3,
    title: "Build a Stunning Creative Portfolio in Just 10 Minutes",
    description:
      "In this video, I will show you how to create a beautiful and modern portfolio website in just 10 minutes! Quick and effective web development.",
    videoId: "p2_FN9djQNc",
    thumbnail: "/images/blog3.png",
    category: "Portfolio",
    duration: "10:23",
  },
]
4. Place your profile picture, favicon, and blog thumbnails in the public/images/ directory. The project expects specific filenames, so name your images profile.jpg, favicon.jpg, and blog1.png, blog2.png, etc.
5. Start the local development server. Open your web browser and go to http://localhost:3000 to view your new portfolio.
npm run devDeployment
Vercel (Recommended)
- Push Your Code: Make sure your customized code is pushed to a Git repository on a platform like GitHub, GitLab, or Bitbucket.
- Connect to Vercel: Sign up for a free Vercel account and connect it to your Git provider.
- Import Your Project: From your Vercel dashboard, select “Add New… > Project”. Choose your
linkinbio-nextjsrepository from the list. - Deploy: Vercel automatically detects that it is a Next.js 14 project. It sets the build command and output directory for you. Click the “Deploy” button to start the process.
Your site will be live in a few moments. Vercel also provides automatic deployments, so any future git push to your main branch will trigger a new build and update your live site.
Netlify
- Push to Git: Ensure your project is available on a supported Git provider.
- Connect to Netlify: Sign up for a Netlify account and link your Git provider.
- Create a New Site: From the Netlify dashboard, click “Add new site > Import an existing project”. Select your repository.
- Configure Build Settings: Netlify will ask for your build settings. You must configure them as follows:
- Build command:
npm run build - Publish directory:
.next
- Build command:
- Deploy Site: Click “Deploy site”. Netlify will build your project and deploy it to its global network.
Other Platforms
You can host this project on other services that support Node.js applications.
- Railway: Connect your GitHub repository to a new Railway project. Railway automatically detects the Next.js application and handles the build and deployment process for you.
- DigitalOcean App Platform: Connect your repository to the App Platform. DigitalOcean will recognize the Node.js environment. You may need to confirm the build command (
npm run build) and the start command (npm run start) during the setup process.
Related Resources
- Next.js Documentation – Official guide to Next.js features, App Router, and deployment options for building modern React applications.
- Tailwind CSS Components – Premium component library with glassmorphism designs and responsive layouts compatible with this template.
- Framer Motion API – Animation library documentation with examples and guides for creating smooth transitions and interactive elements.
- Vercel Deployment Guide – Step-by-step instructions for deploying Next.js applications with automatic optimization and global CDN distribution.
FAQs
Q: How do I change the glassmorphism effects or disable them completely?
A: The glassmorphism effects are controlled through Tailwind CSS classes like backdrop-blur-md and bg-opacity-20. You can modify these classes in the component files or replace them with solid backgrounds by removing the blur and opacity utilities.
Q: Is it possible to use regular blog posts instead of YouTube videos in the carousel?
A: Yes, you can modify the blog data structure to include regular URLs instead of YouTube video IDs. Update the modal component to display web content or redirect to external blog posts rather than embedding YouTube videos.
Q: What happens if I don’t have YouTube videos for the blog carousel?
A: You can remove the carousel component entirely or modify it to display static content, images, or links to external articles. The template structure allows for easy customization of the content display format.
Q: How do I change the main colors and theme?
A: You can customize the color scheme by modifying the tailwind.config.ts file. This file allows you to define your own color palette, which will be applied across the application.