The Future of Web Dev
The Future of Web Dev
Auto-Generated Skeleton Screens from Your Real UI – boneyard-js
Generate layout-accurate skeleton loading screens with boneyard-js. A CLI captures live component dimensions across breakpoints automatically.
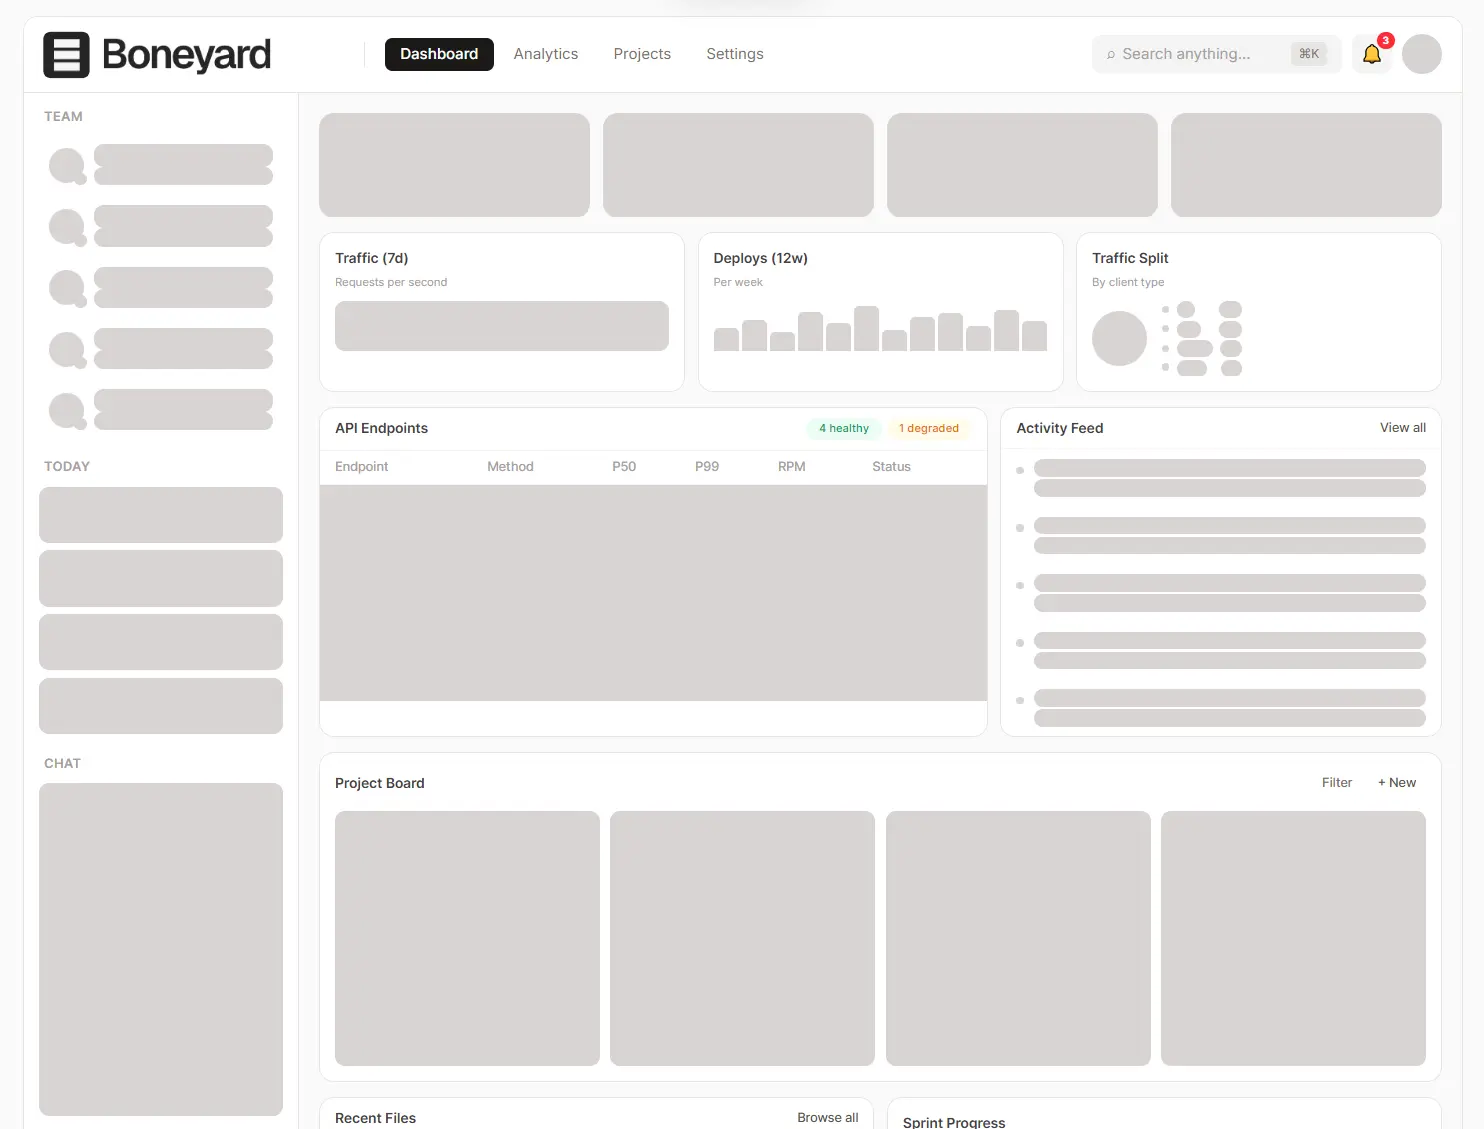
boneyard-js is a skeleton loading framework that auto-generates pixel-perfect placeholder screens directly from your live component layout.
A CLI tool visits your running dev server through a headless browser, locates every named <Skeleton> wrapper, and captures a flat list of sized and positioned rectangles at multiple viewport widths. Those measurements land in a .bones.json file alongside your source.
The capture runs against the real rendered output, so the skeleton dimensions stay accurate to your actual UI across breakpoints. A generated registry file maps each named component to its bone data, and a single import in your app entry wires everything up at runtime.
Features
🖼️ Pixel-Perfect Capture: Records exact component dimensions and positions from the live rendered UI at each target viewport width.
📐 Multi-Breakpoint Snapshots: Captures skeleton layouts at multiple viewport widths in a single CLI run.
🔄 Layout Sync: Skeleton screens stay accurate to real component dimensions after each CLI build.
📱 Cross-Framework Support: Works with React, Svelte, Vue, Angular, and React Native from a single shared output format.
🎨 Three Animation Modes: Ships with pulse, shimmer, and solid animation styles for skeleton display.
🌙 Dark Mode Support: Accepts separate color values for light and dark mode skeleton fills.
🧩 Auto Registry Resolution: A generated registry file maps each named component to its bone data at runtime.
📦 Incremental Cache: Skips components that have not changed between CLI runs to cut rebuild time.
🔌 Fixture Support for Data-Dependent Components: Accepts mock content rendered only during the CLI capture step, with no effect on production output.
📱 React Native: Walks the fiber tree and measures native views directly on the connected device during a dev build.
Use Cases
- Blog and news sites that fetch post data asynchronously and need loading placeholders that mirror real article card dimensions.
- E-commerce product pages where image grids, price blocks, and description panels each require layout-accurate skeletons during data fetch.
- React Native apps displaying profile cards or feed items during initial load, where native view measurements drive skeleton accuracy.
- Dashboard interfaces with multiple data-dependent panels that load independently and need distinct, correctly-sized placeholder layouts.
How to Use It
Table Of Contents
Installation
Install the package with your preferred package manager:
npm install boneyard-js
# or
yarn add boneyard-js
# or
pnpm add boneyard-js
React
Wrap any component that fetches data with the <Skeleton> wrapper. Assign a unique name prop to each one. The CLI uses this name to identify the component and write the corresponding .bones.json file.
import { Skeleton } from 'boneyard-js/react'
function BlogPage() {
  const { data, isLoading } = useFetch('/api/post')
  return (
    <Skeleton name="blog-card" loading={isLoading}>
      {data && <BlogCard data={data} />}
    </Skeleton>
  )
}
Next.js App Router. The <Skeleton> component uses React hooks internally. Add "use client" at the top of any file that imports it.
Data-dependent components. If your component requires API data to render its full layout, pass a fixture prop with mock content. The CLI renders this fixture during the build step to capture the layout. The fixture has no effect in production.
<Skeleton
  name="blog-card"
  loading={isLoading}
  fixture={<BlogCard data={mockPost} />}
>
  {data && <BlogCard data={data} />}
</Skeleton>
With your dev server running, execute the CLI:
npx boneyard-js buildThe CLI visits your app at multiple viewport widths, snapshots every named <Skeleton>, and writes a .bones.json file for each one. It also generates a registry.js file in the bones output directory. Add a single import to your app entry:
// Add once in your app entry (e.g. main.tsx or index.tsx)
import './bones/registry'
Every <Skeleton> now resolves its bone data automatically by name at runtime.
Svelte
Import the Skeleton component and the generated registry in your layout or page file:
<script>
  import Skeleton from 'boneyard-js/svelte'
  import '$lib/bones/registry'
  let loading = true
</script>
<Skeleton name="card" {loading}>
  <Card />
</Skeleton>
Run the CLI with your dev server active:
npx boneyard-js buildAdd the registry import once in your +layout.svelte or +page.svelte:
import '$lib/bones/registry'Vue
Set up the Skeleton component in your Vue file using the Composition API:
<script setup>
import { ref } from 'vue'
import Skeleton from 'boneyard-js/vue'
import './bones/registry'
const loading = ref(true)
</script>
<template>
  <Skeleton name="blog-card" :loading="loading">
    <BlogCard />
  </Skeleton>
</template>
Run the CLI:
npx boneyard-js buildAdd the registry import once in your app entry file (e.g. main.ts):
import './bones/registry'Angular
Import SkeletonComponent as a standalone component in your Angular module or component file:
import { Component } from '@angular/core'
import { SkeletonComponent } from 'boneyard-js/angular'
import './bones/registry'
@Component({
  selector: 'app-root',
  standalone: true,
  imports: [SkeletonComponent],
  template: `
    <boneyard-skeleton name="blog-card" [loading]="isLoading">
      <app-blog-card />
    </boneyard-skeleton>
  `
})
export class AppComponent {
  isLoading = true
}
Run the CLI:
npx boneyard-js buildAdd the registry import once in main.ts:
import './bones/registry'React Native
Import the native Skeleton component from the React Native entry point:
import { Skeleton } from 'boneyard-js/native'
<Skeleton name="profile-card" loading={isLoading}>
  <ProfileCard />
</Skeleton>
Run the CLI with the --native flag and specify your output directory:
npx boneyard-js build --native --out ./bonesOpen your app on a connected device or emulator. The skeleton component scans the native layout through the React fiber tree, measures views via the native layout API, and sends bone data to the CLI. Add the registry import once in your app entry:
// Add once in your app entry, then reload
import './bones/registry'
The --native flag bypasses the headless browser entirely. Capture runs from on-device layout measurements in dev mode only, with zero overhead in production.
CLI Reference
# auto-detect running dev server
npx boneyard-js build
# target an explicit dev server URL
npx boneyard-js build http://localhost:3000
# React Native capture mode
npx boneyard-js build --native --out ./bones
# set custom viewport widths
npx boneyard-js build --breakpoints 390,820,1440
# skip the incremental cache
npx boneyard-js build --force
Config File
Create a boneyard.config.json file at your project root to set global defaults:
{
  "breakpoints": [375, 768, 1280],
  "out": "./src/bones",
  "wait": 800,
  "color": "#e5e5e5",
  "animate": "pulse"
}
Per-component props on the <Skeleton> wrapper override these config values at runtime.
| Key | Type | Description |
|---|---|---|
breakpoints | number[] | Viewport widths in pixels at which the CLI captures component layouts. |
out | string | Output directory path for .bones.json files and the registry. |
wait | number | Milliseconds the CLI waits after page load before capturing snapshots. |
color | string | Default bone fill color applied to all components globally. |
animate | string | Default animation style applied globally. |
Skeleton Component Props
| Prop | Type | Default | Description |
|---|---|---|---|
loading | boolean | — | Toggles between skeleton display and real content. |
name | string | — | Unique identifier for the component; determines the output .bones.json filename. |
color | string | rgba(0,0,0,0.08) | Fill color for skeleton bones in light mode. |
darkColor | string | rgba(255,255,255,0.06) | Fill color for skeleton bones in dark mode. |
animate | 'pulse' | 'shimmer' | 'solid' | 'pulse' | Animation style applied to the skeleton display. |
fixture | ReactNode / Snippet | — | Mock content rendered only during the CLI capture step; never appears in production. |
initialBones | ResponsiveBones | — | Passes bone data directly to the component, bypassing the registry lookup. |
fallback | ReactNode / Snippet | — | Content displayed when loading is true but no bones data is available yet. |
Related Resources
- 10 Best React Loading Spinner & Indicator Components for Web & Mobile
- 7 Best Loading/Progress Indicator Libraries For Vue.js
- 10 Best Loading Spinner/Indicator JavaScript & CSS Libraries
FAQs
Q: Does boneyard-js work in Next.js App Router projects?
A: Yes. Add "use client" to any file that imports <Skeleton>. The component uses React hooks internally and runs only on the client side.
Q: What renders if no bones data exists when a component mounts?
A: The component displays the content passed to the fallback prop. If no fallback is set, <Skeleton> renders nothing until bones resolve from the registry.
Q: Is specifying a URL required when running the CLI?
A: No. The CLI auto-detects a running dev server on common local ports. Pass an explicit URL only if your server runs on a non-standard port.
Q: How do I capture skeletons for components that require real API data to render?
A: Pass mock data to the fixture prop. The CLI renders this fixture during the build step to capture the full layout. The fixture has no effect in production builds.
Q: Can multiple components share the same name value?
A: No. Each name must be unique across the project. The CLI writes and resolves individual .bones.json files by name, and duplicates overwrite each other’s output.