Yet Another Status Page is a self-hosted status communication platform that tracks service uptime and manages incident notifications.
It runs on Next.js with Payload CMS as the content management layer and PostgreSQL as the database.
The platform handles incident tracking through a timeline-based update system and sends automated notifications to subscribers via SMTP email and Twilio SMS.
Features
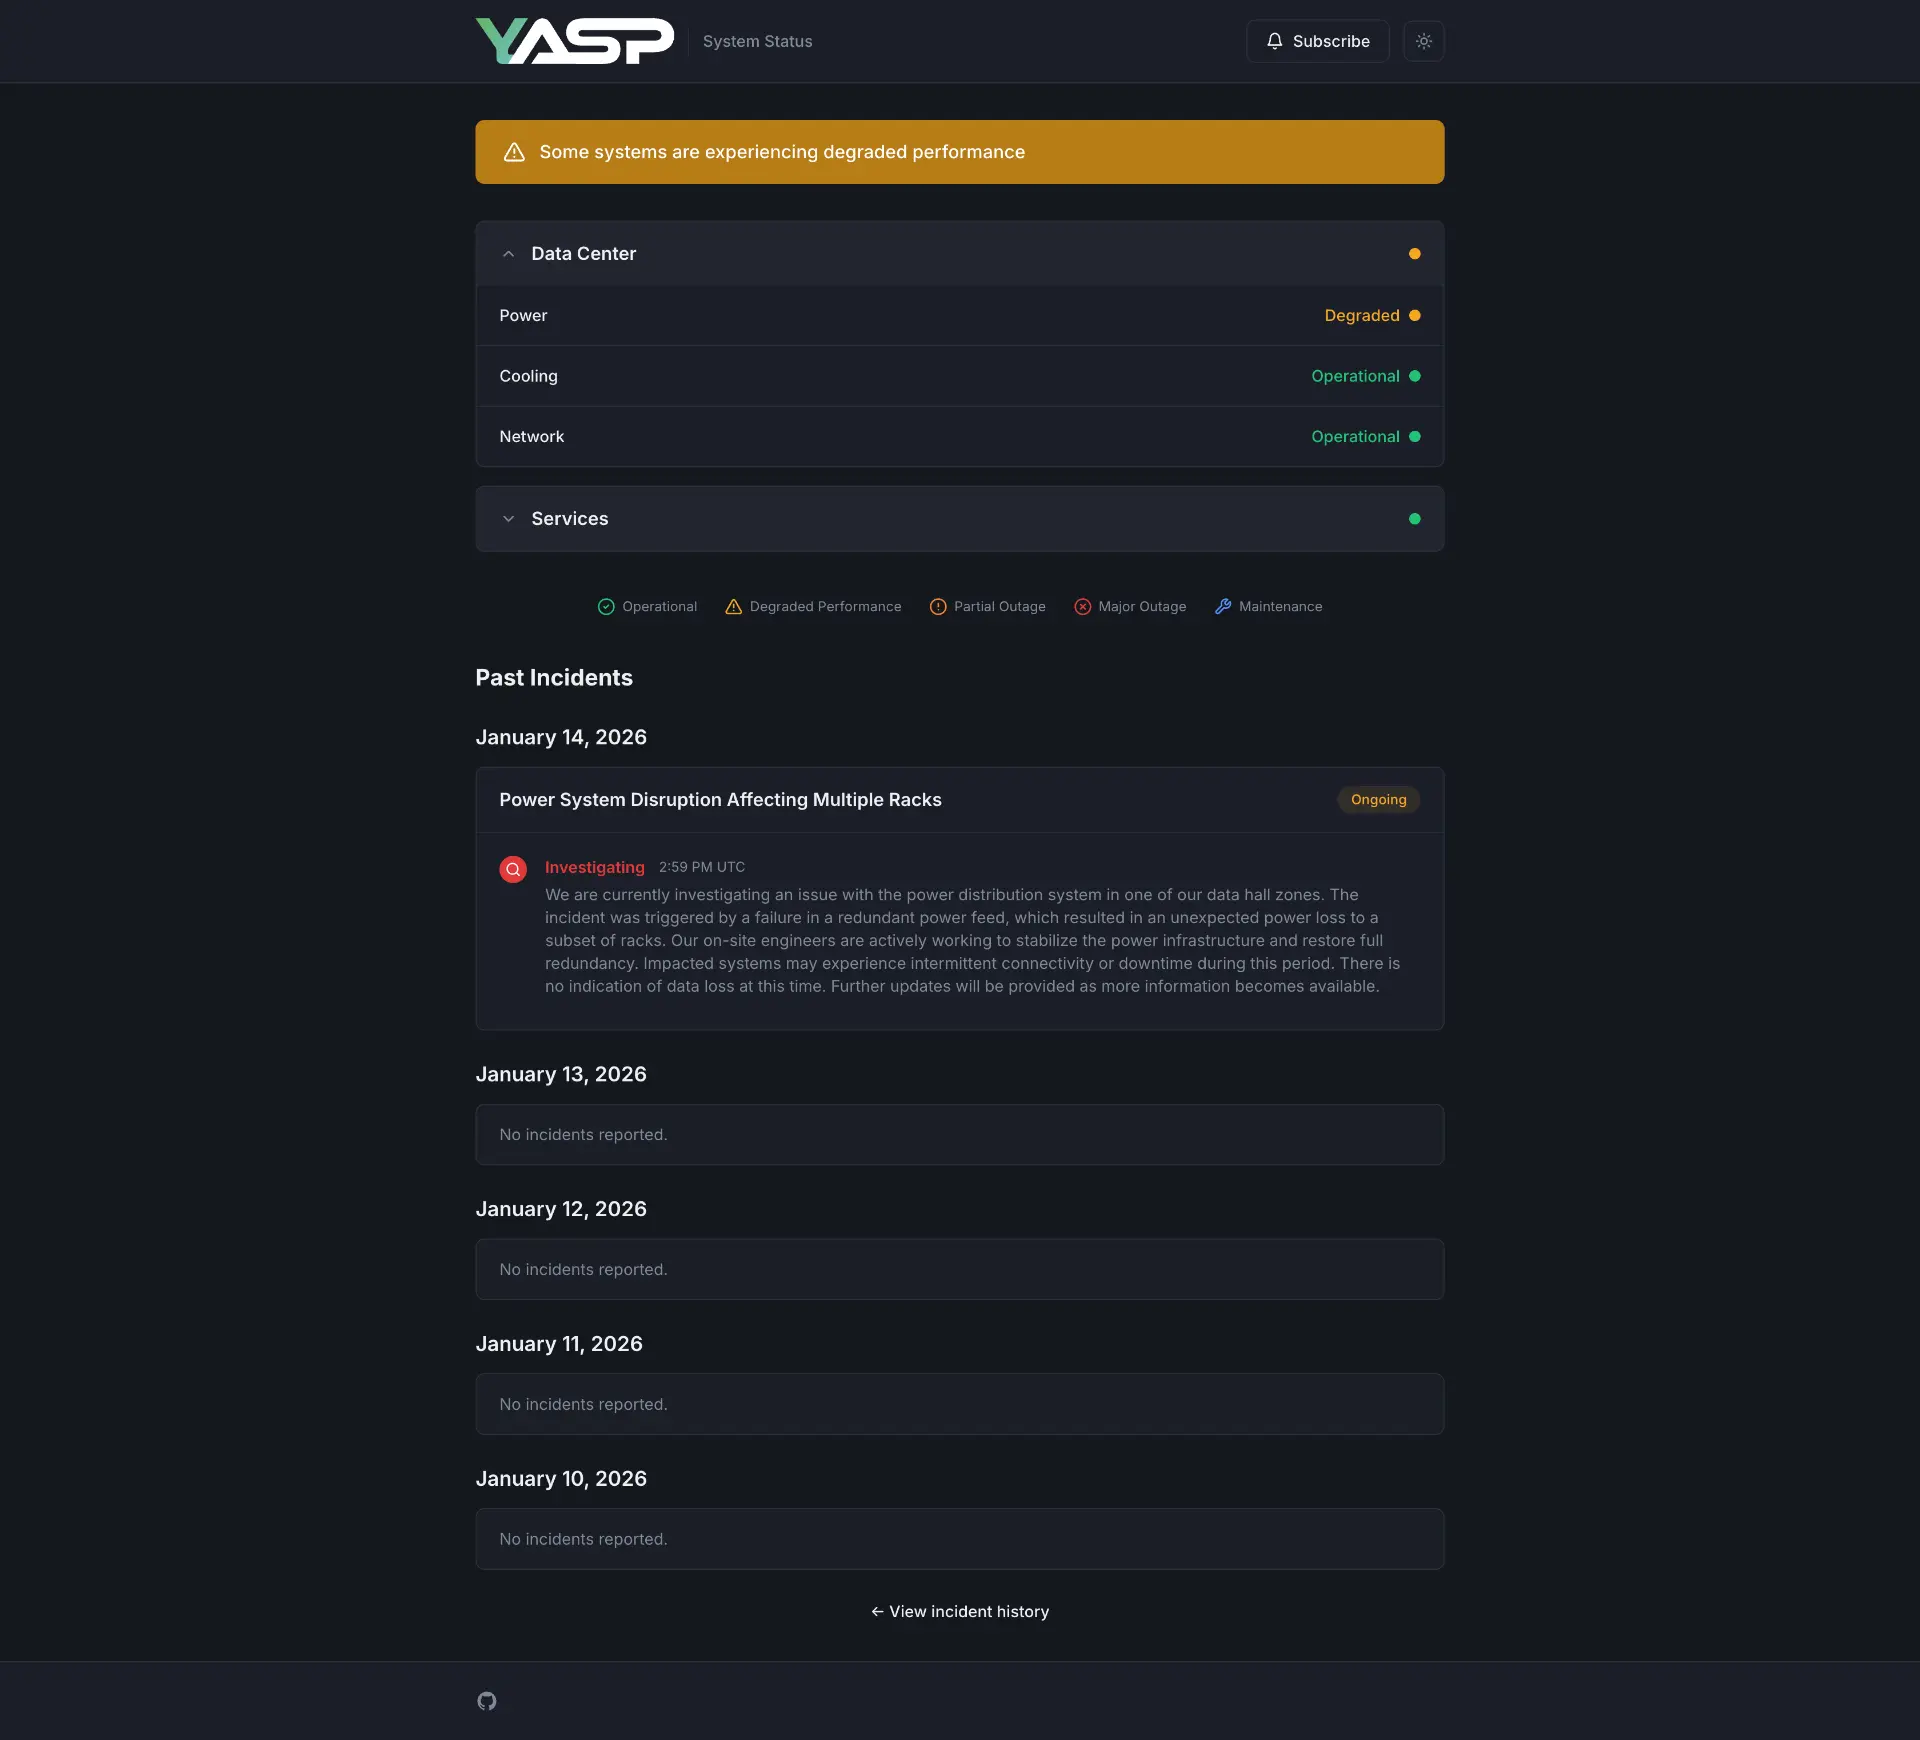
🚨 Incident Management: Track service disruptions through a timeline interface that logs status changes and updates.
🔧 Scheduled Maintenance: Plan maintenance windows with automatic subscriber notifications before and during the work.
📧 Email Notifications: Send updates to subscribers through SMTP with customizable templates.
📱 SMS Notifications: Deliver alerts via Twilio with configurable message templates and character limits.
📊 Service Groups: Organize monitored services into logical categories.
🎨 Dark Mode Support: Switch between light and dark themes on the public status page.
🐳 Docker Ready: Deploy with Docker Compose or use pre-built images from GitHub Container Registry.
🔐 OIDC Authentication: Integrate single sign-on with Keycloak, Okta, Auth0, Azure AD, or Google.
Use Cases
- Internal Service Monitoring: Teams running microservices can track the health of individual components and notify developers when systems go down.
- SaaS Customer Communication: Software companies can keep customers informed about platform issues and planned maintenance without relying on third-party status services.
- Infrastructure Documentation: Operations teams can maintain a historical record of incidents and maintenance events for compliance reporting.
- Multi-Environment Tracking: Development teams can run separate status pages for production, staging, and development environments to track issues across all deployment tiers.
How to Use It
Option 1: Deploy to Vercel
Click the Deploy with Vercel button to create a new project with managed PostgreSQL.
The deployment process will prompt you to set PAYLOAD_SECRET. Generate a random string of at least 32 characters for this value. Vercel automatically detects POSTGRES_URL when you add a Vercel Postgres database and sets SERVER_URL from your production URL.
After deployment completes, add a Vercel Blob store in your project’s Storage settings. Navigate to your Vercel project dashboard, select Storage, create a new Blob database, and copy the BLOB_READ_WRITE_TOKEN to your environment variables. Media uploads will not function without this configuration.
Option 2: Docker Compose Deployment
Clone the repository to your local machine.
git clone https://github.com/Hostzero-GmbH/yet-another-status-page.git
cd yet-another-status-page
Copy the example environment file.
cp .env.example .envEdit the .env file with your configuration values.
DATABASE_URI=postgres://hostzero:your-secure-password@db:5432/hostzero_status
POSTGRES_PASSWORD=your-secure-password
PAYLOAD_SECRET=your-32-character-secret-key-here
SERVER_URL=https://status.yourdomain.com
Start the services with Docker Compose.
docker compose up -dThe application runs on port 3000. Access the status page at http://localhost:3000 and the admin panel at http://localhost:3000/admin.
Option 3: Pre-built Docker Image
Pull the latest image from GitHub Container Registry.
docker pull ghcr.io/hostzero-gmbh/status-page:latestRun the container with your PostgreSQL connection.
docker run -d \
  --name status-page \
  -p 3000:3000 \
  -e DATABASE_URI=postgres://user:pass@host:5432/db \
  -e PAYLOAD_SECRET=your-secret-key \
  -e SERVER_URL=https://status.example.com \
  ghcr.io/hostzero-gmbh/status-page:latest
Option 4: Build from Source
Clone the repository and install dependencies.
git clone https://github.com/Hostzero-GmbH/yet-another-status-page.git
cd yet-another-status-page
npm install
Build the application.
npm run buildStart the production server.
npm startProduction Deployment with Traefik
Create a docker-compose.yml file with Traefik labels for SSL termination.
version: '3.8'
services:
  app:
    image: ghcr.io/hostzero-gmbh/status-page:latest
    environment:
      - DATABASE_URI=${DATABASE_URI}
      - PAYLOAD_SECRET=${PAYLOAD_SECRET}
      - SERVER_URL=https://status.yourdomain.com
    depends_on:
      db:
        condition: service_healthy
    restart: unless-stopped
    volumes:
      - uploads:/app/public/media
    labels:
      - "traefik.enable=true"
      - "traefik.http.routers.status.rule=Host(`status.yourdomain.com`)"
      - "traefik.http.routers.status.entrypoints=websecure"
      - "traefik.http.routers.status.tls.certresolver=letsencrypt"
      - "traefik.http.services.status.loadbalancer.server.port=3000"
    networks:
      - traefik
      - internal
  db:
    image: postgres:16-alpine
    environment:
      - POSTGRES_USER=hostzero
      - POSTGRES_PASSWORD=${POSTGRES_PASSWORD}
      - POSTGRES_DB=hostzero_status
    volumes:
      - postgres_data:/var/lib/postgresql/data
    healthcheck:
      test: ["CMD-SHELL", "pg_isready -U hostzero -d hostzero_status"]
      interval: 5s
      timeout: 5s
      retries: 5
    restart: unless-stopped
    networks:
      - internal
volumes:
  postgres_data:
  uploads:
networks:
  traefik:
    external: true
  internal:
Production Deployment with nginx
Create a docker-compose.yml file with nginx as a reverse proxy.
version: '3.8'
services:
  nginx:
    image: nginx:alpine
    ports:
      - "80:80"
      - "443:443"
    volumes:
      - ./nginx.conf:/etc/nginx/nginx.conf:ro
      - ./certs:/etc/nginx/certs:ro
    depends_on:
      - app
    restart: unless-stopped
  app:
    image: ghcr.io/hostzero-gmbh/status-page:latest
    environment:
      - DATABASE_URI=${DATABASE_URI}
      - PAYLOAD_SECRET=${PAYLOAD_SECRET}
      - SERVER_URL=https://status.yourdomain.com
    depends_on:
      db:
        condition: service_healthy
    restart: unless-stopped
    volumes:
      - uploads:/app/public/media
  db:
    image: postgres:16-alpine
    environment:
      - POSTGRES_USER=hostzero
      - POSTGRES_PASSWORD=${POSTGRES_PASSWORD}
      - POSTGRES_DB=hostzero_status
    volumes:
      - postgres_data:/var/lib/postgresql/data
    healthcheck:
      test: ["CMD-SHELL", "pg_isready -U hostzero -d hostzero_status"]
      interval: 5s
      timeout: 5s
      retries: 5
    restart: unless-stopped
volumes:
  postgres_data:
  uploads:
Initial Configuration
Navigate to http://your-server:3000/admin after the first deployment. The system prompts you to create an admin account. Access Configuration in the admin panel to set up your status page.
Under Site Settings, configure your site name, description, favicon, and logos for both light and dark themes. Add SEO metadata and set up status override options for maintenance mode.
Under Email Settings, enter your SMTP host, port, security type, username, and password. Set the from address and display name for outgoing notifications. Enable email subscriptions to allow users to register for updates.
Under SMS Settings, add your Twilio Account SID, Auth Token, and either a From Number or Messaging Service SID. Customize SMS templates with placeholders like {{siteName}}, {{title}}, {{status}}, and {{message}}. Enable SMS subscriptions to activate text message alerts.
OIDC Authentication Setup
Configure single sign-on by setting environment variables for your identity provider.
OIDC_CLIENT_ID=your-client-id
OIDC_CLIENT_SECRET=your-client-secret
OIDC_AUTH_URL=https://keycloak.example.com/realms/main/protocol/openid-connect/auth
OIDC_TOKEN_URL=https://keycloak.example.com/realms/main/protocol/openid-connect/token
OIDC_USERINFO_URL=https://keycloak.example.com/realms/main/protocol/openid-connect/userinfo
OIDC_SCOPES=openid profile email groups
Set the callback URL in your identity provider to https://your-status-page.com/api/users/oauth/callback.
For group-based access control, configure your identity provider to include group claims in the userinfo response.
OIDC_ALLOWED_GROUPS=status-page-admins,status-page-editors
OIDC_GROUP_CLAIM=groups
To disable password login and require SSO for all users, set OIDC_DISABLE_LOCAL_LOGIN=true.
Managing Incidents
Navigate to Status then Incidents in the admin panel. Click Create New and fill in the incident title, select affected services, set the current status, and choose the impact level. The system automatically creates a notification draft when you save the incident.
Go to Notifications to review the draft. Edit the message content if needed and click Send Notification Now to alert all subscribers.
Add updates to the incident by editing the record and adding new timeline entries. Each update generates a new notification draft that you can review and send.
Mark the incident as resolved when the issue is fixed. The final status change creates a resolution notification for subscribers.
Managing Maintenance
Navigate to Status then Maintenances in the admin panel. Click Create New and enter the maintenance title, affected services, and schedule details. Set the start and end times for the maintenance window.
The system creates a notification draft automatically. Review the notification in the Notifications section and send it to inform subscribers about the upcoming maintenance.
Update the maintenance status as work progresses. The system generates new notification drafts for each status change.
Database Backup
Back up your PostgreSQL database with this command.
docker compose exec db pg_dump -U hostzero hostzero_status > backup.sqlRestore from a backup file.
cat backup.sql | docker compose exec -T db psql -U hostzero hostzero_statusBack up uploaded media files.
docker compose cp app:/app/public/media ./media-backupUpdating the Application
Pull the latest image from the container registry.
docker compose pullRestart the services with the new image.
docker compose up -dRelated Resources
- Payload CMS: A TypeScript-first headless CMS that handles content management and API generation.
- Next.js: A React framework that renders server-side pages and manages routing for the status page.
- Twilio: A cloud communications platform that sends SMS notifications to subscribers.
- Nodemailer: An SMTP client for Node.js that handles email delivery.
FAQs
Q: How do I migrate from localStorage to Vercel Blob?
A: Deploy with a Vercel Blob store configured from the start. The application does not support localStorage and requires Vercel Blob for media uploads on the Vercel platform.
Q: Can I customize the notification templates?
A: Yes. Edit SMS templates in Configuration then SMS Settings. Email templates are controlled through the notification draft interface where you can modify content before sending.
Q: How do I restrict access to specific SSO groups?
A: Set OIDC_ALLOWED_GROUPS to a comma-separated list of group names. Configure your identity provider to include group claims in the userinfo response and set OIDC_GROUP_CLAIM if your provider uses a different claim name.
Q: What happens if I enable SSO-only mode accidentally?
A: Access to the admin panel will require SSO authentication. Test your SSO configuration thoroughly before setting OIDC_DISABLE_LOCAL_LOGIN=true to avoid being locked out.