The Future of Web Dev
The Future of Web Dev
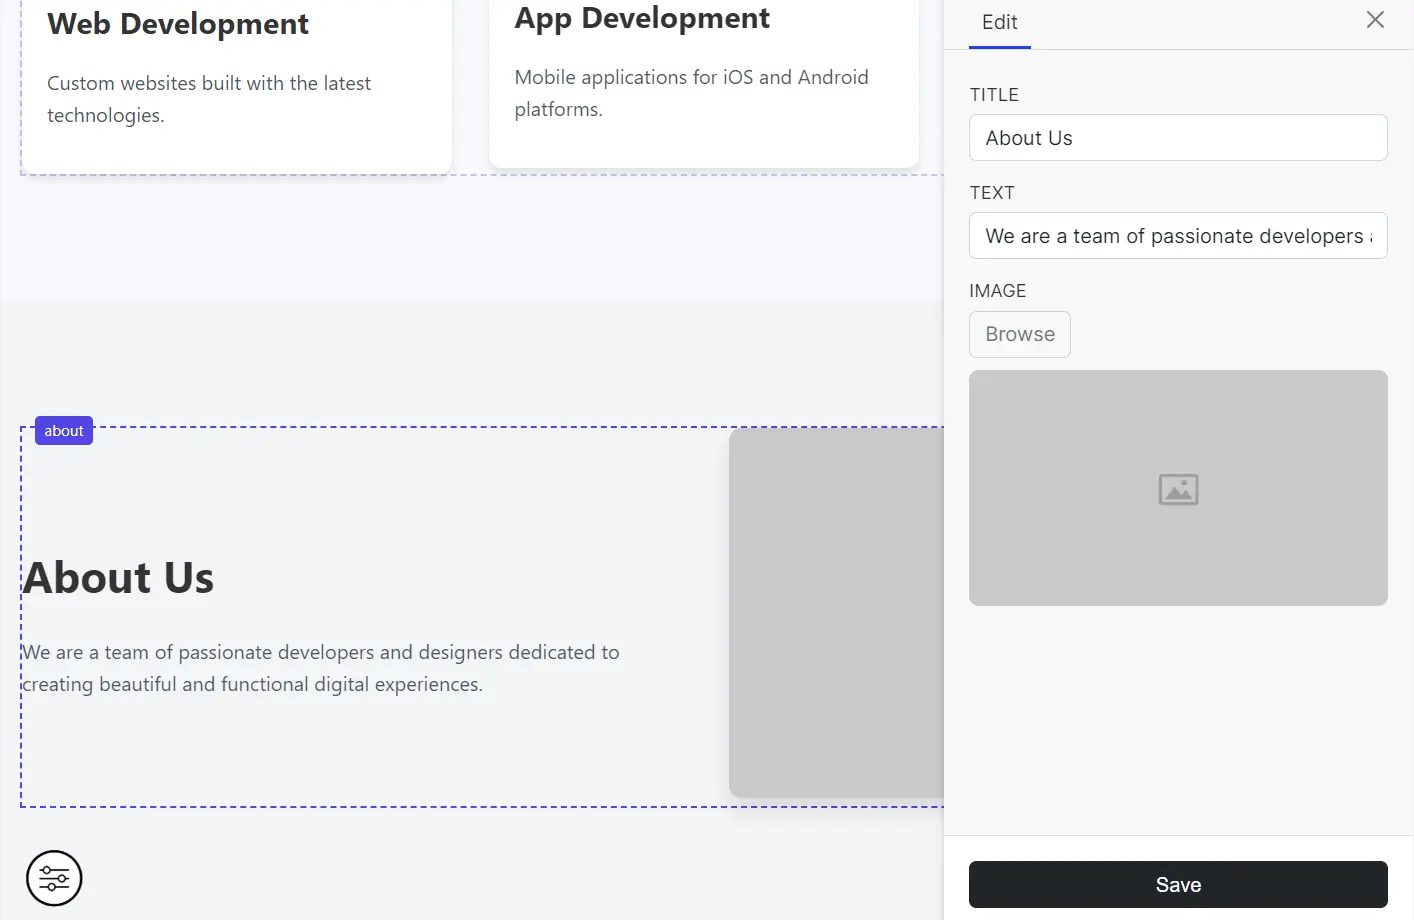
On-Page Content Editing for Alpine Projects – Page Editor
Easily edit content in your Alpine.js projects with the Alpine.js Page Editor. Direct in-browser editing, image handling, and dynamic content.
Alpine.js Page Editor is a lightweight JavaScript library that brings direct on-page editing to any project using Alpine.js.
This editor supports single-line and multiline text editing. It also handles in-browser image uploads and resizing. You can add, delete, and reorder items within defined groups.
Features
📝 Automatic Form Generation: The editor intelligently creates input fields based on your existing data structure.
🖼️ Image Handling: Includes built-in image upload and resizing capabilities, right in the browser.
✍️ Text Editing: Supports both single-line and multi-line text inputs for different content types.
🔄 Dynamic Content Management: Add, remove, and rearrange content blocks with ease.
Use Cases
- Client-Managed Websites: If you build websites for clients who need to update content themselves, this editor offers a simple solution. It skips the traditional, and possibly complex, CMS backend.
- Landing Pages: Quickly adjust text, images, and sections on landing pages without touching the code.
- Prototype Development: It can make it easier to create content during rapid prototyping with client-side only.
- Simple Blog Platforms: Manage blog posts directly on the page. Adding new posts or editing existing ones becomes visual and intuitive.
- E-commerce Product Pages: If you need to keep product descriptions, details and images easily updateable, this editor can help it.
Installation
To integrate the Alpine.js Page Editor into your project, follow these steps:
- First, make sure you have Alpine.js installed in your project.
- Add the necessary scripts and CSS to your HTML file, preferably at the bottom of the page:
<!-- Page Editor CSS -->
<link rel="stylesheet" href="js/alpinejs-page-editor.css" />
<!-- Pica for image resizing -->
<script src="https://cdnjs.cloudflare.com/ajax/libs/pica/9.0.1/pica.min.js" integrity="sha512-FH8Ofw1HLbwK/UTvlNBxsfICDXYZBr9dPuTh3j17E5n1QZjaucKikW6UwMREFo7Z42AlIigHha3UVwWepr0Ujw==" crossorigin="anonymous" referrerpolicy="no-referrer"></script>
<!-- Page Editor js -->
<script src="js/alpinejs-page-editor.js"></script>- Wrap your page content in an Alpine.js data container:
<div x-data="app" id="app"></div>- Create your data structure in JSON format according to the conventions described in the usage section.
- To test locally, you can run:
npx serveThis will start a local server on localhost:3000.
Usage
Making Elements Editable
To make an element editable, add the x-editable attribute to it. The value of this attribute should correspond to the key in your data.json file:
<!-- The value of x-editable should correspond to the key in your data, 'hero' in this case -->
<div x-editable="hero"></div>
Understanding Data Structure Conventions
The editor uses specific naming conventions to determine input types:
- Each section of your site corresponds to a top-level object key in data.json.
- Specific key names trigger different input types:
- Keys named
intro,body,details, ordescriptionbecome multiline inputs (textareas) - Keys named
imagebecome image uploaders - All other keys become single-line inputs
Example data structure:
{
    "hero": {
        "title": "Welcome to Alpine.js Page Editor",
        "description": "A simple, reactive content editor that works with any HTML structure",
        "image": "img/placeholder.jpg"
    }
}
Working with Groups of Items
You can create editable groups or arrays of items by adding an items key containing an array of objects:
{
    "services": {
        "title": "Our Services",
        "description": "We offer a wide range of services to meet your needs",
        "items": [
            {
                "title": "Web Development",
                "description": "Custom websites built with the latest technologies.",
                "image": "img/placeholder.jpg"
            },
            {
                "title": "App Development",
                "description": "Mobile applications for iOS and Android platforms.",
                "image": "img/placeholder.jpg"
            }
        ]
    }
}
These groups support adding, deleting, and reordering functionality.
Configuration Options
You can customize the editor behavior by providing a global cfg object:
cfg = {
    enableSettings: true, // decides if the 'settings' button is visible
    page: 'home', // this param is posted to /api/save when the user presses the 'save button'
    template: 'default', // this param is posted to /api/save when the user presses the 'save button'
};
Related Resources
- Alpine.js – The lightweight JavaScript framework that Alpine.js Page Editor is built to work with. It provides reactive and declarative capabilities with a minimal footprint. https://alpinejs.dev/
- Pica – A high-quality, fast image resize in browser. This library powers the image resizing functionality in Alpine.js Page Editor. https://github.com/nodeca/pica
- TailwindCSS – A utility-first CSS framework that pairs well with Alpine.js for creating custom interfaces. Many Alpine.js projects use Tailwind for styling. https://tailwindcss.com/
- AlpineJS X-Tag Components – A collection of reusable Alpine.js components that can complement the page editor functionality. https://github.com/alpinejs/alpine-x-tag
FAQs
Q: What is the data format required for Alpine.js Page Editor?
A: Your data should be structured as a JSON object. Top-level keys represent sections, and specific key names (intro, body, details, description, image, items) determine input types.
Q: Can I use this editor with frameworks other than Alpine.js?
A: This editor is specifically designed for Alpine.js projects.
Q: How does image resizing work?
A: The editor uses the Pica library for client-side image resizing, improving performance by avoiding server-side processing.
Q: Do I need to modify my existing Alpine.js code to use this editor?
A: Minimal changes are required. You primarily need to add the x-editable attribute to elements you want to make editable and ensure your data structure follows the expected conventions.
Q: Can the editor handle nested data structures?
A: Yes, the editor supports nested data through the items array mechanism, allowing you to create editable groups that can be managed independently.
Q: How does the save functionality work?
A: When a user presses the save button, the editor posts the updated data to /api/save along with any configuration parameters you’ve specified (like page and template).
Q: Can I customize the appearance of the editor?
A: The editor comes with default styling, but you can modify the CSS to match your project’s design system if needed.
Preview