The Future of Web Dev
The Future of Web Dev
Next.js Waitlist Template with Notion CMS Integration – Waitly
Quickly launch a waitlist page with Waitly, a Next.js template using Notion as a CMS, Upstash Redis for rate limiting, and Resend for emails.

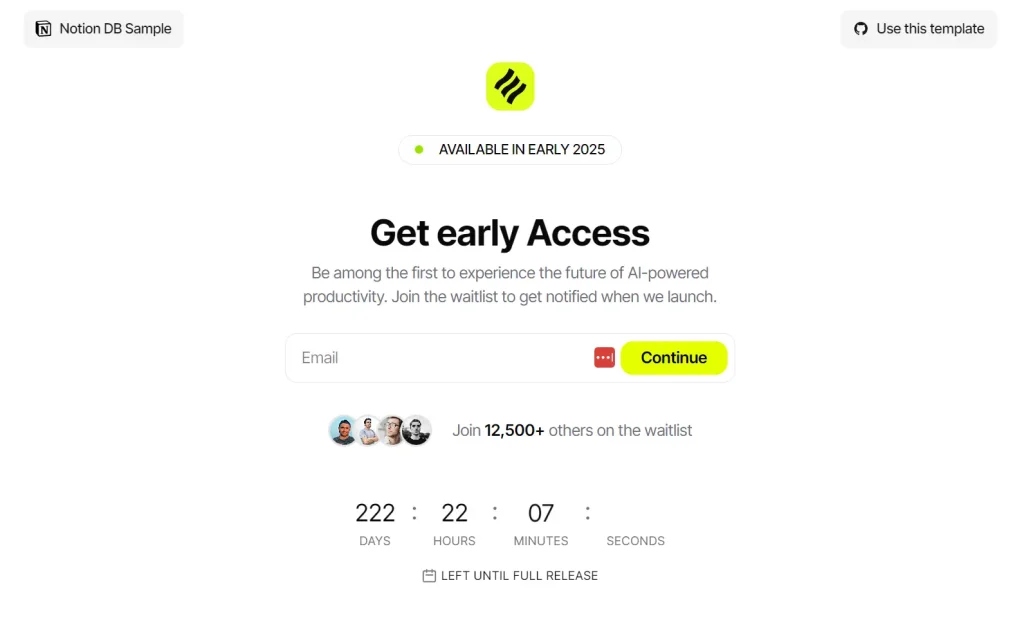
Waitly is a Next.js template that allows you to quickly launch a waitlist page.
It uses Notion as a content management system (CMS), Upstash Redis for rate limiting, and Resend for sending emails with a custom domain.
This combination of technologies allows for a performant and easy solution for collecting user interest before a full product launch.
Features
⚡ One-Click Vercel Deploy – Launch your waitlist in under 5 minutes
🎨 Tailwind CSS Styling – Modern, responsive design system
💪 TypeScript Support – Type-safe development experience
📱 Mobile Responsive – Works perfectly on all device sizes
📧 Resend Email Integration – Send confirmation emails with custom domain support
🛡️ Built-in Security – Rate limiting and input validation included
⚙️ Environment Configuration – Easy setup with environment variables
Use Cases
- SaaS Product Launches – Validate your software idea before building the full product by collecting interested users
- Mobile App Beta Testing – Gather a pool of early testers for your iOS or Android application
- E-commerce Store Openings – Build anticipation for new online stores or product lines
- Course or Workshop Launches – Collect potential students for educational content or training programs
- Community Platform Development – Gauge interest for new forums, social networks, or membership sites
Installation
Set up these external services before installation:
Upstash Redis Account
- Create account at Upstash
- Create Redis database
- Copy REST API endpoint and token
Resend Email Service
- Sign up at Resend
- Verify your sending domain
- Generate API key
- Note the email address for sending emails (e.g.,
[email protected]). This isRESEND_FROM_EMAIL
Notion Workspace Setup
- Create new database with Name (Title) and Email columns
- Optionally, add
Signed Up At(Created time) - Create integration at Notion Integrations
- Share database with your integration
- Copy database ID from URL
Local Development
1. Clone the Repository
git clone https://github.com/Idee8/waitly.git
cd waitly
2. Install Dependencies
pnpm install3. Configure Environment Variables
cp .env.example .env.localAdd your service credentials:
UPSTASH_REDIS_REST_URL=your_redis_url
UPSTASH_REDIS_REST_TOKEN=your_redis_token
NOTION_SECRET=your_notion_secret
NOTION_DB=your_database_id
RESEND_API_KEY=your_resend_key
[email protected]
4. Start Development Server
pnpm devUsage
1. Basic Setup
After installation, your waitlist page runs on localhost:3000. Users can sign up through the form, which automatically saves entries to your Notion database and sends confirmation emails.
2. Customization
Modify the waitlist page by editing components in the src directory. The template uses Tailwind CSS for styling, making design changes straightforward. Update colors, fonts, and layout by modifying the Tailwind configuration.
3. Database Management
Access your Notion database to view signups, export email lists, or add custom fields. The integration supports standard Notion database operations, including filtering, sorting, and bulk actions.
4. Email Templates
Customize confirmation emails by editing the Resend templates. You can modify the email content, add your branding, and include additional information for new subscribers.
FAQs
Q: Can I use this template for multiple projects?
A: Yes, you can deploy multiple instances of Waitly for different projects. Each deployment requires its own set of environment variables and Notion database.
Q: How many signups can the template handle?
A: The template scales with your chosen services. Notion databases support thousands of entries, while Upstash Redis and Resend have generous free tiers that accommodate most waitlist sizes.
Q: Can I customize the email templates?
A: Yes, you can modify the email templates in the Resend dashboard or by updating the email components in the codebase. The template supports HTML emails with custom styling.
Q: Does the template work without Notion?
A: Notion integration is core to this template’s design. For different database solutions, you’d need to modify the API routes to work with your preferred database system.
Q: How do I export my waitlist data?
A: You can export your waitlist directly from Notion using their built-in export features, or access the data programmatically through the Notion API for custom integrations.
Preview